Virtual tours have become increasingly popular in recent years, providing an immersive experience for viewers to explore space without physically being there. They are especially useful for real estate, hospitality, and tourism industries, but can also be used for personal projects and creative endeavors. However, creating a virtual tour may seem daunting, especially for those without experience or a large budget. Fortunately, there are free tools available that make it easy to create a 360 virtual tour in just five minutes. In this article, we’ll guide you through the process of creating a virtual tour for free using Lapentor.
Prepare the 360 photos
Choose a 360-camera
Before creating the 360 virtual tour, you will need to choose a 360 camera that fits your budget and needs and capture 360 pictures. There are many affordable options available, such as the Ricoh Theta SC or the Samsung Gear 360, that can capture high-quality 360-degree images and videos. These cameras typically have two fisheye lenses that capture images from all directions and stitch them together to create a panoramic view.
Take 360 Photos
Once you have your 360 camera, it’s time to take photos of the space you want to create a virtual tour of. Make sure to capture multiple angles and viewpoints to give viewers a complete picture of the space. When taking photos, it’s important to maintain consistency in lighting and distance between shots to ensure a seamless transition in the final virtual tour. It’s also a good idea to capture details and points of interest that viewers may want to explore.
Make a 360 Virtual Tour Free
Quick steps to guide you on How to create a Virtual Tour in 1 minute using Lapentor.com – The most simple and intuitive virtual tour platform which supports Self-Hosting on your own domain.
Step 1: Register and create a free account here: https://app.lapentor.com
Just enter your username, email, and password to get started.
Step 2: Create a new project

Step 2: Upload your panorama images & making Sphere
Ensure your 360 photos are in the equirectangular format (photos with a 2:1 ratio. E.g. 6000×3000 px)

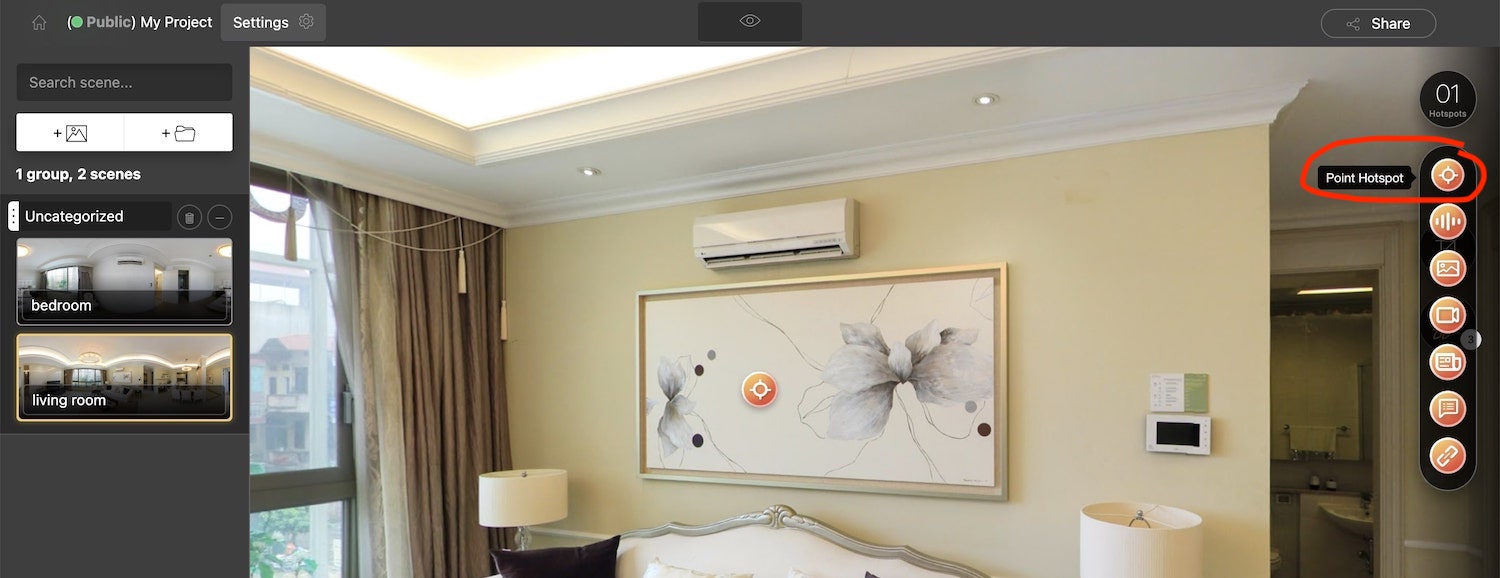
Step 3: Create some hotspots and connect scenes/panoramas together
Creating a Point hotspot is the first step to connecting your 360 photos/panorama pictures together. Lapentor provides other 6 types of hotspots to make your Virtual Tour more interactive and immersive
- Point hotspot: connect scenes together to make a complete virtual tour
- Directional Sound hotspot: bring sound/music to your virtual tour
- Image hotspot: add static photos to your project
- Video hotspot: add Youtube/Vimeo videos to your project
- Article hotspot: you can insert a whole blog post into your virtual tour project
- Info hotspot: if you want to add a short description or text, it’s for you
- URL hotspot: add external links/URLs to your virtual tour to make it more informative
Step 4: Preview your Virtual Tour & Publish
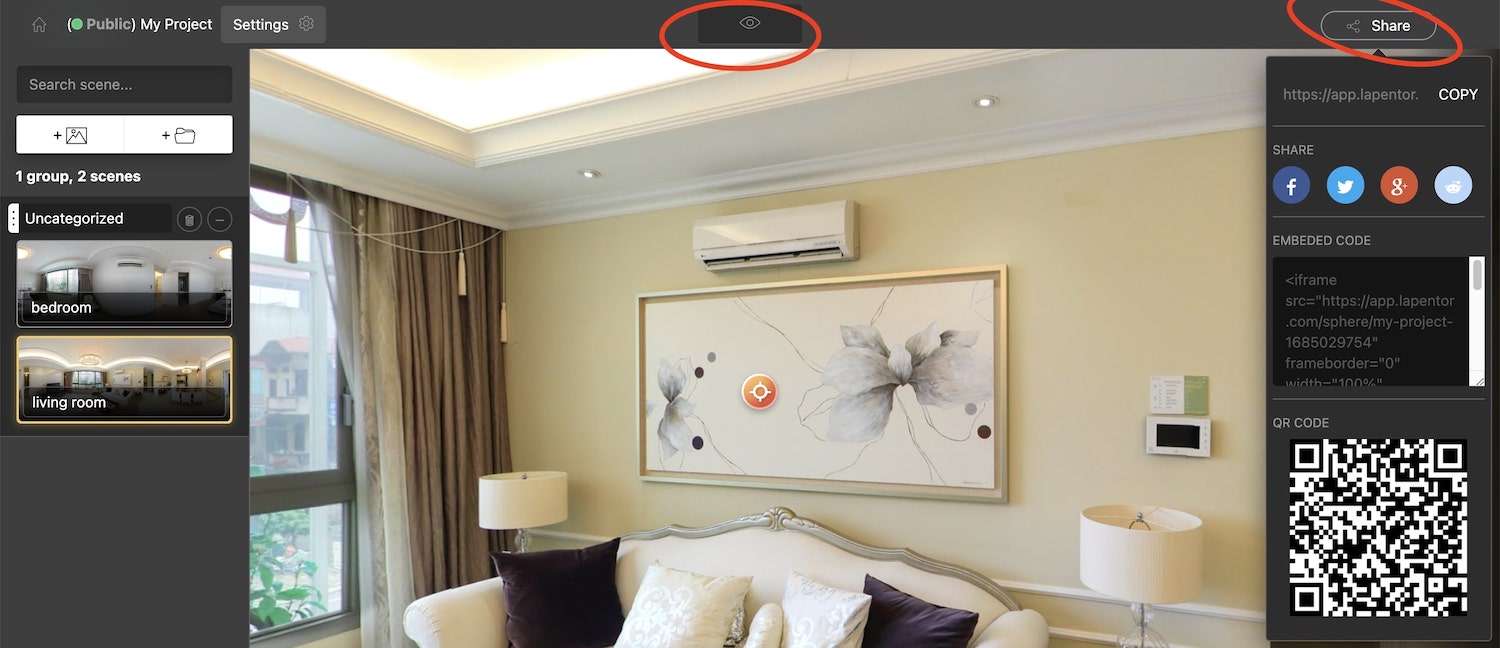
All of your changes are saved automatically right after each step and published instantly.
Once you have created your virtual tour, it’s time to share it with your audience. You can embed it on your website, social media, or other platforms to reach your target audience. Embedding it on your website will allow visitors to explore the space without leaving your site, increasing engagement and dwell time. Sharing it on social media can also increase visibility and attract new viewers.
Before uploading your panoramas, it’s important to ensure they look polished and professional. Basic post-processing such as color correction, exposure balancing, and sharpening can significantly improve visual quality and viewer immersion. If your images need refinement, professional 360 image enhancement services can help optimize lighting, colors, and clarity, making your virtual tour more engaging and realistic.
The Video Tutorial
If the texts above are too long to read, watch this tutorial video
In conclusion, creating a 360 virtual tour, 360 real estate tour, 360 tourism tour, etc… for free is easy and accessible, even for those with no prior experience. With just a 360 camera and a free online virtual tour platform like Lapentor, you can create a virtual tour that showcases your space and provides a unique viewing experience for your audience. By following these simple steps, you can create a virtual tour in just five minutes and share it with the world. Give it a try and see how it can benefit your business or project!

