Have you ever wanted to guide your virtual tour visitors’ focus, or perhaps hide a less-than-perfect area in your 360-degree scene? Lapentor’s Limit View feature is your secret weapon! It lets you control exactly how much your audience can look around, ensuring they see what you want them to see.
Don’t worry if you’re new to virtual tours or Lapentor. This guide is designed for beginners, and we’ll walk you through each step to easily limit the view in your Lapentor virtual tour.
Why Use the Limit View Virtual Tour Feature?
Before we dive in, let’s quickly chat about why this feature is so handy:
- Focus Attention: Guide your viewers’ eyes to key points of interest.
- Hide Distractions: Conceal areas that aren’t relevant or ready for prime time.
- Create Guided Experiences: Lead your audience through a specific visual journey.
- Enhance Storytelling: Direct the narrative of your 360 scene.
Ready to take control of your virtual tour’s perspective? Let’s get started!
Step-by-Step: Setting Your Virtual Tour’s Limit View in Lapentor
Follow these simple steps to master the Limit View in your Lapentor project:
Step 1: Open Your Project
First things first, log in to Lapentor and open the virtual tour project you want to edit. You’ll find your projects easily accessible on your dashboard.
Step 2: Choose Your Scene
Navigate to the specific scene within your project where you want to limit the view. You can select your scenes from the scene list on the left side of your editor.
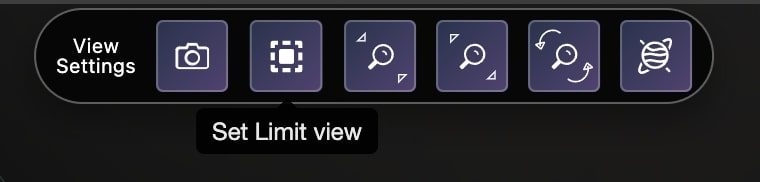
Step 3: Access View Settings
Once you’re in the right scene, look for the “View settings” menu. Inside this menu, you’ll see a square icon – give that a click! This is your gateway to controlling the view.
Step 4: Set Your Limits! (Top, Down, Left, Right)
Now for the fun part! After clicking the square icon, you’ll be able to move your scene around. As you adjust the view, you’ll see options to set limit view for:
- Top: Restrict how far up a user can look.
- Down: Control how far down they can see.
- Bottom: (Often the same as ‘Down’ depending on the interface, but important to check!)
- Left: Define how far left they can pan.
- Right: Set the boundary for how far right they can look.
Simply adjust the scene to your desired boundaries and apply the limits. Lapentor makes it super intuitive to restrict the view precisely.

You Did It!
Congratulations! You’ve just learned how to effectively use the Limit View feature in Lapentor. By taking control of the viewing experience, you’re making your virtual tours even more impactful and professional.
Feel free to play around with these settings in different scenes. You’ll quickly discover how powerful this tool is for enhancing your immersive virtual tours.